Drilling in the wrong place is an expensive and visible mistake. A pull that sits too close to the edge can split the door. One that is off-centre by a few millimetres looks fine up close and noticeably wrong across a whole kitchen. Getting cabinet pull placement right is not complicated, but it needs a clear method and a few exact measurements before you touch a drill. This guide gives you the standard rules for upper doors, lower doors and drawers, plus how to handle exceptions without second-guessing every decision.
Quick Summary of Cabinet Pull Placement
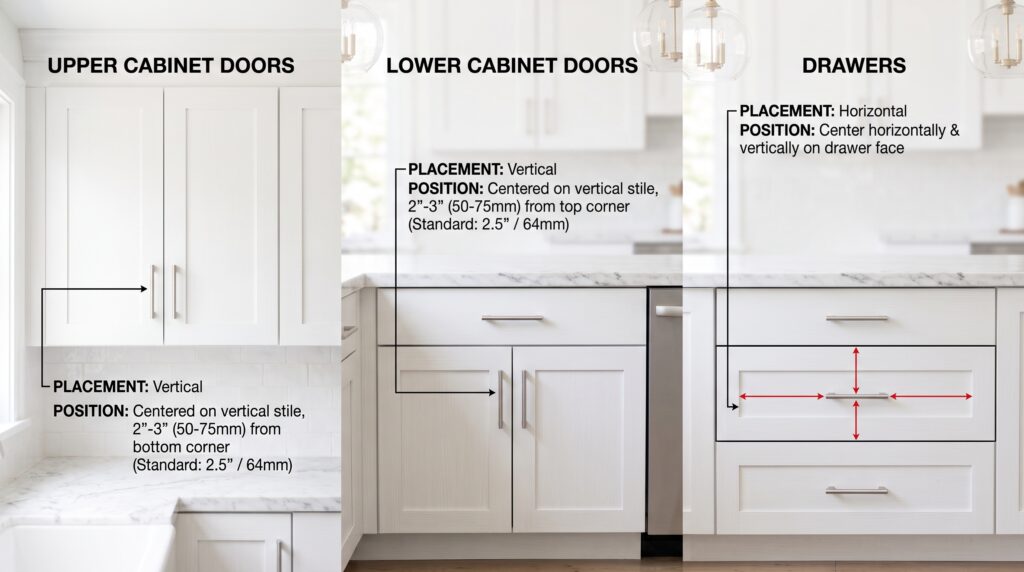
The universal rule for cabinet pull placement is that hardware goes where your hand naturally wants to reach. On upper cabinet doors, that is near the bottom of the door on the opening side. On lower cabinet doors, it is near the top. The standard corner offset is 64 mm from both the rail and the stile edge. On drawers, a single pull is centred horizontally and placed in the upper third of the drawer face for narrow drawers. Wide drawers over 900 mm use two pulls placed symmetrically.
Shaker cabinet hardware follows the same corner logic but is placed within the stile frame to avoid spanning the panel joint. A bar pull sits vertically on the stile for doors and horizontally for drawers. A knob sits at the corner where the stile meets the nearest rail. For handleless cabinet options, edge pulls and gola channels replace visible hardware entirely. A drilling jig makes consistent cabinet hardware placement achievable across an entire kitchen without measuring each position individually.
Tools and Measurements You Need
Before marking a single position, gather the right tools. Working without them adds errors and wastes time.
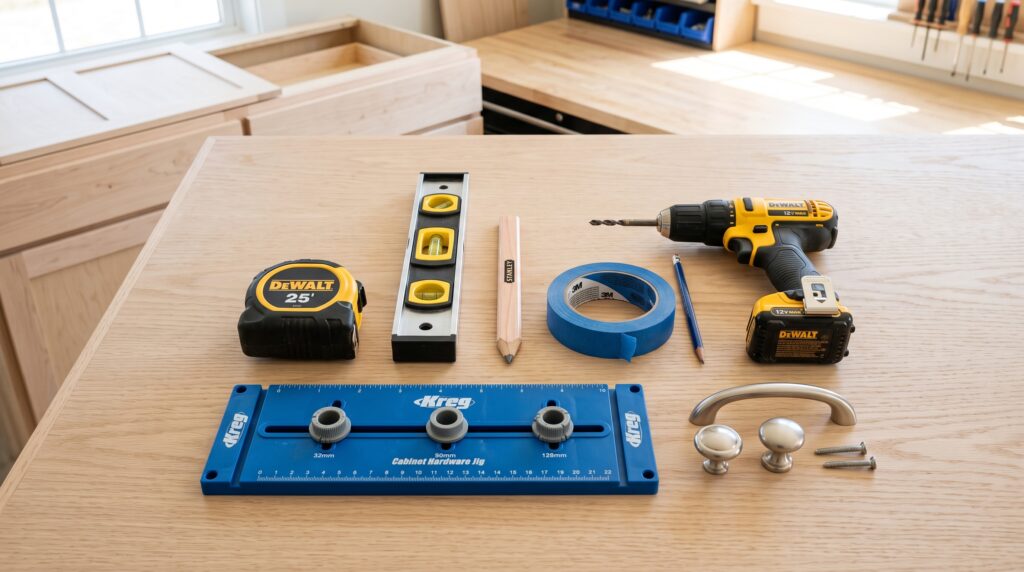
A tape measure and a combination square are the core tools. The tape gives you distances; the square confirms that marks are at a consistent angle to the door edge. A spirit level is essential for verifying that bar pulls are truly vertical or horizontal before drilling. Painter’s tape protects the door surface and gives you a writable marking surface without leaving pencil marks on the finish.
A centre-to-centre gauge or measurement card is useful for confirming the screw hole spacing of your pull before ordering. The centre-to-centre measurement is the distance between the two screw holes. Most residential pulls use 96 mm, 128 mm or 160 mm centre-to-centre spacing. Always confirm this against the pull packaging before drilling.
A cabinet hardware jig, also called a drilling template, is a slotted guide that locates drill holes at a consistent offset from the door corner without individual measurement. For a full kitchen of ten or more doors and drawers, it saves significant time and reduces the risk of compounding errors.
Pre-Drilling Checklist
Upper Cabinet Pull Placement
On an upper cabinet door, hardware goes near the bottom of the door on the opening side. This is where your hand reaches naturally when pulling a door that is above your sightline.
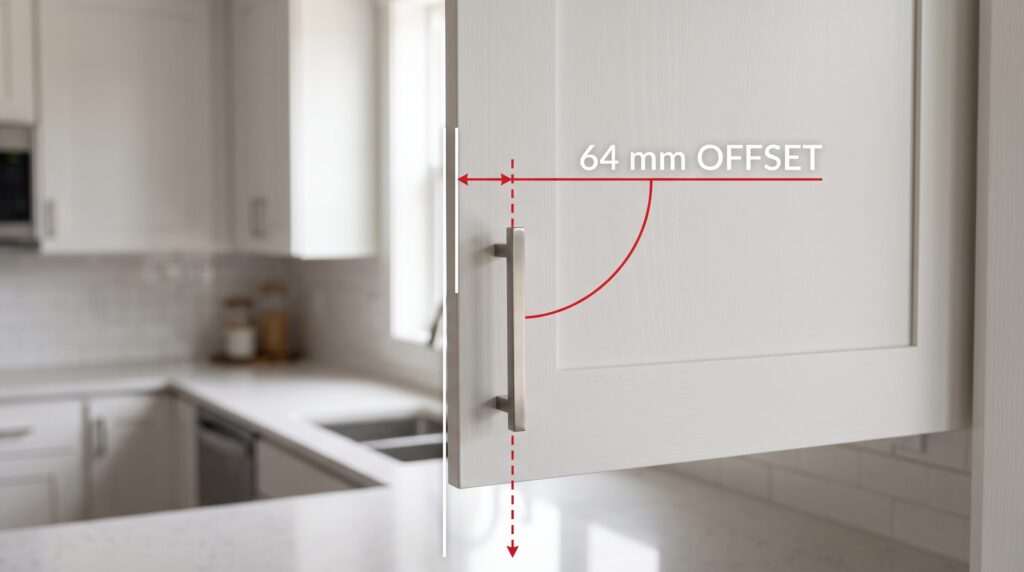
Bar pulls. Place a vertical bar pull on the stile, the vertical member of the door frame on the opening side. The bottom screw of the pull should be roughly 64 mm from the bottom rail and the outer edge of the stile. This gives the hand a natural grip point and keeps the pull well clear of the door edge and the hinge side.
Knobs. Place a knob in the lower corner of the door on the opening side, where the stile meets the bottom rail. The centre of the knob should sit approximately 64 mm from both the bottom rail and the stile edge. On a shaker kitchen cabinet, this positions the knob within the stile rather than across the panel junction, which is the correct placement for that door style.
Horizontal bar pulls on upper doors. A horizontal bar pull on an upper door is placed near the bottom of the door, running across the lower section of the door face rather than along the stile. This is more common on flat panel doors where the stile is not a distinct separate member.
Lower Cabinet Pull Placement
On a lower cabinet door, hardware goes near the top of the door on the opening side. When reaching down to open a base cabinet, your hand approaches from above, so the pull should be where the grip naturally falls.
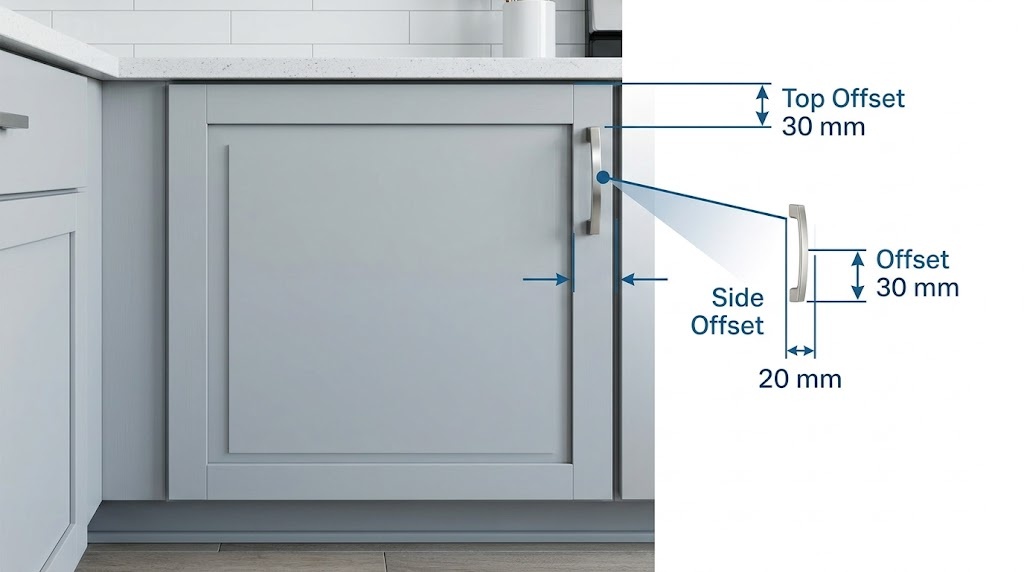
Bar pulls. Place a vertical bar pull on the upper section of the opening-side stile. The top screw of the pull should sit roughly 64 mm from the top rail and the stile edge. This mirrors the upper door placement logic exactly but inverted. The same 64 mm offset applies to both slab and shaker doors.
Knobs. Place a knob in the upper corner of the door on the opening side, with the centre approximately 64 mm from the top rail and stile edge. On a flat panel cabinet door, where there is no visible stile, measure 64 mm from the top edge and from the opening-side edge to locate the centre of the knob.
Slab versus Shaker doors. On a shaker door, both the stile and rail are visible as distinct members, and hardware sits within the stile. On a slab door, the entire face is one continuous surface, and the 64 mm measurement from the corner gives the same ergonomic result with no frame to guide placement.
Drawer Pull Placement by Drawer Size
Drawer pull placement follows a different logic from doors. The pull is centred horizontally on the drawer width in almost all cases. The vertical position and the number of pulls depend on the drawer size.
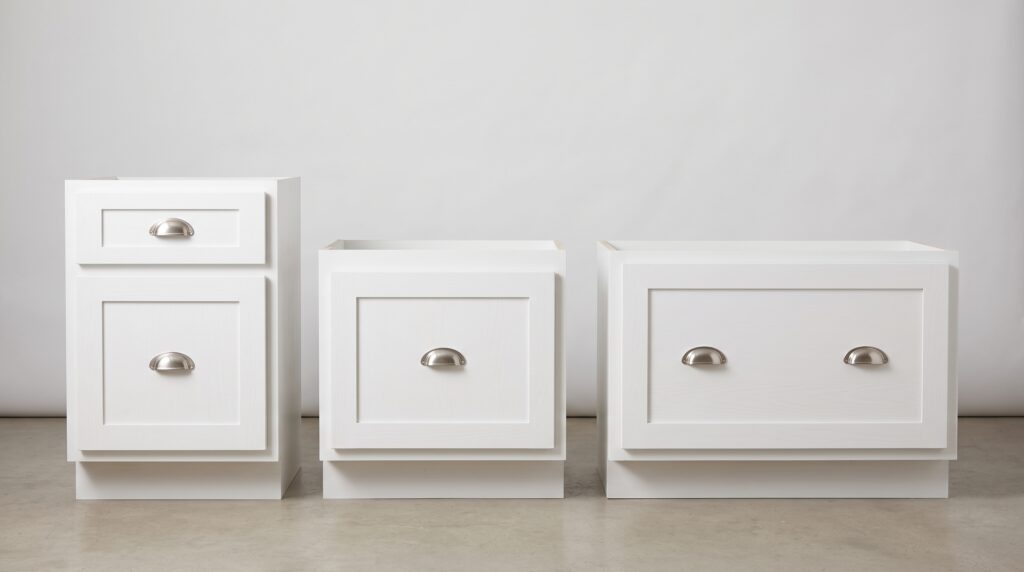
Narrow drawers under 600 mm. Use a single centred pull. Position it in the upper third of the drawer face, roughly one-third of the way down from the top edge. On shallow drawers of 100 to 150 mm height, the pull is simply centred vertically. On deeper drawers, the upper third position gives a more ergonomic downward pull action.
Medium drawers from 600 to 900 mm. A single long pull centred on the drawer face works for most drawers in this range. If the drawer is deep (over 250 mm), a centred vertical position rather than the upper third is more comfortable.
Wide drawers over 900 mm. A single pull on a wide drawer looks visually undersized and provides limited grip. Use two pulls placed symmetrically. Position each pull approximately one-third of the drawer width in from the respective side edge. For a 1,200 mm wide drawer, each pull centre sits roughly 400 mm from its nearest side edge.
Appliance pulls. A full-width appliance pull spans most or all of the drawer width. It is centred vertically on the drawer face and provides an even grip across the full extent of a heavy drawer.
|
Surface |
Hardware Type |
Placement Rule |
Key Measurement |
|---|---|---|---|
|
Upper cabinet door |
Bar pull or knob |
Bottom corner, opening-side stile |
64 mm from rail and stile edge |
|
Lower cabinet door |
Bar pull or knob |
Top corner, opening-side stile |
64 mm from rail and stile edge |
|
Narrow drawer under 600 mm |
Single pull |
Centred horizontally, upper third |
Centred on width |
|
Wide drawer 600 to 900 mm |
Single or two pulls |
Centred or symmetrically paired |
1/3 from each edge if two pulls |
|
Wide drawer over 900 mm |
Two pulls |
Symmetrically placed |
1/3 in from each side edge |
|
Tall pantry door |
Bar pull |
Comfortable reach height |
900 to 1,100 mm from floor |
Knobs Cup Pulls Edge Pulls and Long Handles
Hardware type changes the drilling pattern and sometimes the placement position. Understanding each type before ordering prevents costly redrilling.
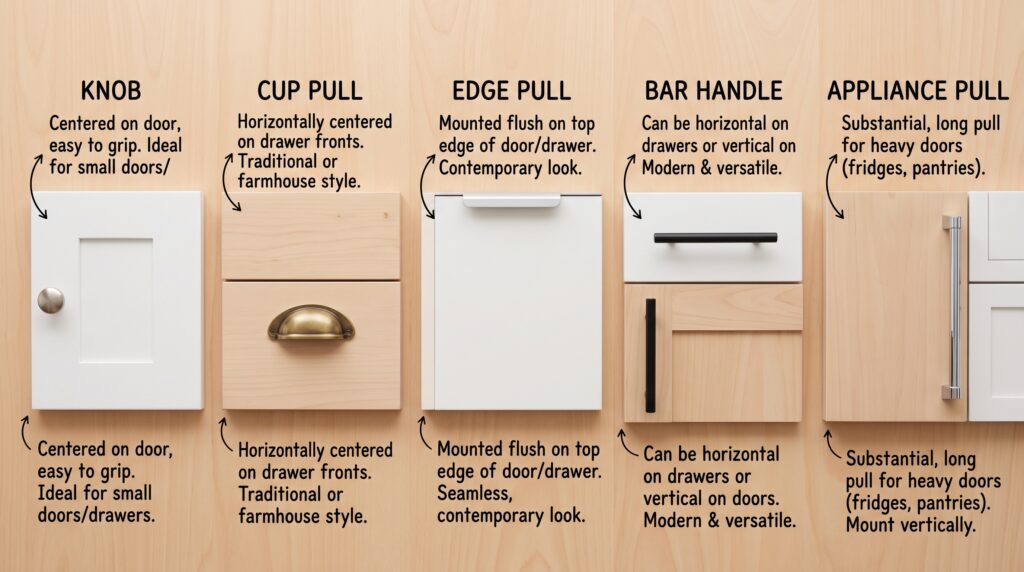
Knobs. A knob requires a single hole. The position rules are the same as for bar pulls: lower corner on upper doors, upper corner on lower doors, 64 mm from the corner. Knobs on drawers are centred on the drawer face. They suit traditional and transitional kitchens. Mixing knobs on doors with pulls on drawers is a common and practical combination.
Cup pulls. A cup or bin pull is a semi-circular handle with two mounting holes. It is traditionally used on drawer faces, centred horizontally, with the cup opening facing downward so fingers hook in naturally. Cup pulls suit shaker, Craftsman and transitional kitchen styles. Their centre-to-centre hole spacing is typically 64 mm, 76 mm or 96 mm.
Edge pulls. An edge pull is a small recessed pull fitted into the edge of a flat panel door. It requires no through-hole on the face, leaving the door surface completely unbroken. The pull is typically centred at the midpoint of the door height or at comfortable reach height. Edge pulls suit contemporary and flat panel and minimalist slab-door styles where a minimal appearance is important.
Long bar handles and appliance pulls. Long bar handles can run the full height of a door or the full width of a drawer. On tall pantry doors, a full-height bar handle eliminates the question of placement height entirely. On wide drawers, an appliance pull running the full drawer width provides a strong visual line and reliable grip. The only measurement needed is the centre-to-centre of the mounting holes.
How to Use a Cabinet Hardware Jig
A cabinet hardware jig is a flat plate or bracket with pre-drilled slots at standard centre-to-centre spacings, plus a reference stop that locks onto the corner of the door or drawer. It removes the need to measure each position individually and ensures every piece of hardware sits at exactly the same offset.
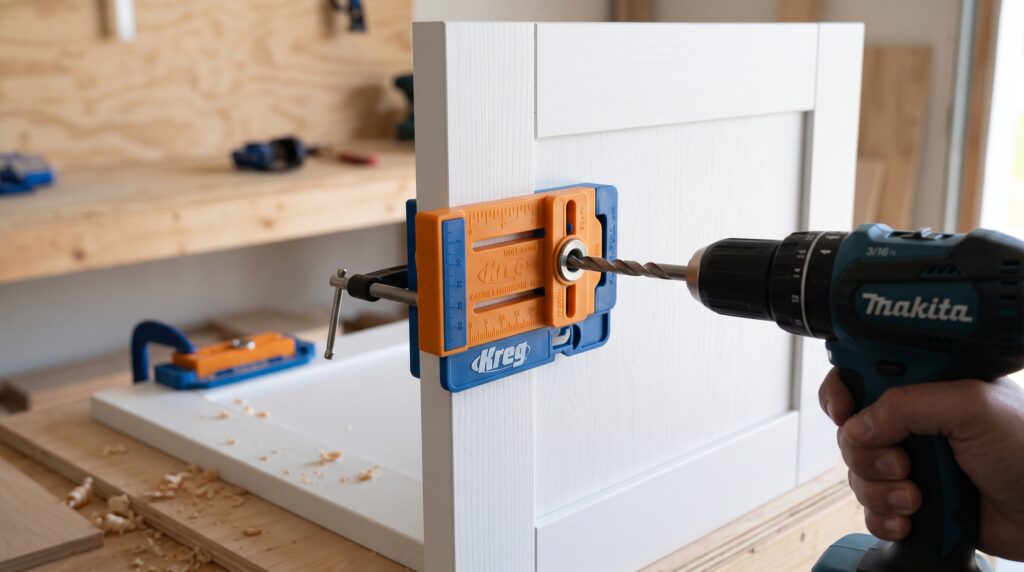
Set the jig to the centre-to-centre measurement of your pull. Most jigs have adjustable slots or interchangeable inserts for common spacings including 96 mm, 128 mm and 160 mm. Lock the corner stop against the edge and rail of the door, confirm it is on the opening side and not the hinge side, and mark or drill through the jig holes.
Before drilling any actual door, always test the jig setting on a scrap piece of the same material and thickness. Confirm the hole spacing matches the pull and that the corner offset looks right. Making this check on a piece of scrap takes two minutes and prevents a ruined door.
When drilling, use a sharp bit sized to the pull screw diameter and drill from the face side of the door into a scrap backing board. This prevents the drill from breaking through the back of the door with a splintered edge. For painted or veneered doors, keep a firm backing contact throughout to protect the finish.
Accessibility and Comfortable Reach
Hardware placement affects daily usability, not just appearance. Standard 64 mm corner placement suits most adults of average height, but a few adjustments matter significantly for specific users.
Wheelchair users and seated adults. On lower cabinet doors, placing pulls as close to the top of the door as the design allows reduces the need to lean forward. Wall cabinet hardware placed low on the door is already within an accessible reach zone for most seated users.
Older adults and limited grip strength. A bar pull gives a firmer, more ergonomic grip than a small knob. A pull diameter of at least 12 to 16 mm is easier to hold. Cup pulls on drawers also suit those who find a flat pull surface difficult to grip.
Tall pantry doors. Placing the pull at the standard lower-corner position forces stooping on a door that reaches the ceiling. Position the pull at comfortable standing reach, typically 900 to 1,100 mm from the floor, centred on the stile. If the pantry uses a handleless kitchen cabinet mechanism, the reach zone is built into the channel and should be specified before installation.
Clearance in tight spaces. Avoid hardware that projects more than 30 mm from the door face in a narrow corridor. Edge pulls and flush-mounted hardware remove this risk entirely.
Order Cabinet Doors Ready for Your Hardware Specification from Parlun Building
Parlun Building manufactures flat panel and shaker cabinet doors factory-direct. Standard stile widths on Parlun shaker doors accommodate the 64 mm corner placement rule without modification, and the consistent door sizing makes a hardware jig reliable across every door in the order. If you are planning a kitchen and want to confirm stile dimensions or discuss your hardware specification before ordering, the Parlun team can advise on compatibility. Request a sample door or a factory quotation through the website.