Preparing balcony door installation correctly
Careful planning and preparation of the installation will make the work much more manageable. Therefore, we would like to give you a few tips from a professional to get you started:
- Position all required materials and tools ready to hand and sorted by time of use.
- Carry out the assembly work in pairs; this is faster and safer when dealing with heavy elements.
- Follow the instructions carefully and perform each step conscientiously, making the optimal result.
Assembly material
- Balcony door to be installed
- Mounting wedges/washers
- Decompression sealing tape
- Window frame screws
- Assembly foam
- PUcleaner/remover
- Mortar, adhesive plaster, putty
- Silicone/acrylic
Tools
- Folding rule
- Spirit level
- Cordless screwdriver
- Impact drill
- Wood/metal/stone drill
- Cartridge press
- Trowel
- Screwdriver
- Safety goggles and gloves
- Cutter knife

General preparations:
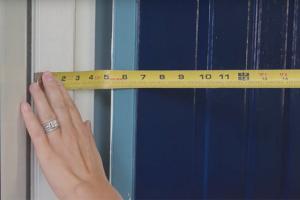
Take measurements and check
Before you start the installation, compare the dimensions of the balcony door with the dimensions of the wall reveal; if the fit is correct, you can begin.
Level plaster
Remove loose masonry and level uneven areas if necessary.
Clean reveal
remove the dust and dirt from the surface with a hand brush.
An inventory check
Check whether you have all the materials and tools you need. This is especially easy with our handy checklist.
Safety
Your safety comes first! Therefore, wear protective gloves and goggles during the entire work process.
Checklist and instructions
Always keep the instructions handy to verify your work steps; the checklist will help you not forget any essential tools or materials.
Sealing levels and types on the window
Careful sealing of the connection between the balcony door and the wall reveals essential for later functionality and durability. A distinction is made between three sealing levels that you should pay attention to:
Outer sealing level
A weatherproof seal is essential for the exterior window joint because it is permanently exposed to the weather. A sealant open to diffusion is recommended to ensure that any moisture that may have penetrated can still escape.
Middle sealing level
Good thermal insulation and reliable soundproofing are ensured at the middle level between the window and the masonry. An expanding PU foam is often used here.
Inner sealing level
The insulation of the inner building connection joint must be impervious to both water and air. This prevents warm, moist room air from entering the joint and thus promoting mold growth.
Multifunctional tapes enable 3-level sealing with just one product. This means much faster installation, easy handling, and only one tape for all functional areas.

Preparations at the balcony door:
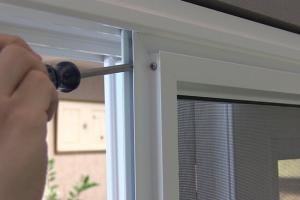
Mount window handle
Place the handle on the pre-drilled holes of the door leaf and then turn it to the 90° position. The cover cap can be opened, and you can screw the handle tightly to the frame.
Unhooking balcony door sash
To unhook the sash, press down the safety pin on the upper hinge (Attention: do not remove it completely!).
Sealing corner joints on the frame
Fill the lower lateral frame joints with silicone to protect them from the weather. Using a transparent filling compound or the respective frame color is best.
Remove the protective film of the frame.
When everything is prepared, you can carefully remove the protective film from the frame. Then place it on a soft surface to avoid scratches or other damage.
Attaching sealing tapes
To fill all three sealing levels in one step, we recommend so-called 3-1 sealing tapes. They are glued all around the frame and inserted with it into the wall reveal. For more information, see Sealing windows.
Optional: Guide rails
Position the rails of the roller shutter curtain with the help of a spirit level, and then set the drill holes for later fixing.

Five steps for installing a balcony door
Insert and fix
Check again if all preparations on the balcony door and the wall reveal have been carried out. Does everything fit? Then you are ready to start. Lift the frame in pairs and carefully place it in the wall opening.
Fix the position with mounting wedges or pressure-resistant washers. Due to the high vertical loads when the balcony door is open, you should not do without support blocks on the underside of the balcony door.
Aligning the frame
The frame is aligned at three points: horizontally, vertically, and in line. For this purpose, use a spirit level and pressure-resistant shim material to precisely control the position. Ensure an equal circumferential distance to the masonry.
Tip: Place the spirit level against the window frame from the inside to measure the alignment, which will allow you to check whether the frame is straight or leaning outward or inward.
A balcony door must be aligned precisely during installation. Therefore, carrying out the installation work in pairs is faster and safer when dealing with heavy elements.
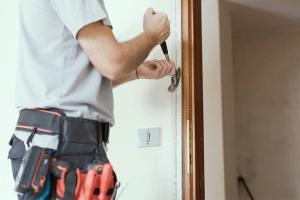
Drilling and screwing
Drill the frame holes with an iron drill in the side window rebate. Ensure a distance between the frame corner and between the holes. Then the wall holes are drilled through the same holes (masonry drill), and the frame is screwed without tension with mounting screws.
Before screwing, the balcony door leaf should be hung on a trial basis, and its functioning during opening and closing should be checked. Use a spirit level to limit that nothing has shifted during hanging before fastening the frame. The mounting wedges can now be removed.
Our tip: Order your balcony door with pre-drilled mounting holes right away at Parlun.
Foam and seal
Once the fit is perfect, you can seal the gaps. If you have used sealing tape, wait until it has fully expanded. You can then fill the gaps in the wall opening with installation foam or sealant, depending on the type of installation. Before doing so, tape the adjacent materials to protect them from contamination.
Remove the excess material and the protective adhesive tape once the foam has fully cured (please follow the manufacturer’s instructions). Minor stains can be easily removed with PU cleaner.
Hang and align the balcony door leaf
Lift the door leaf again in pairs and carefully place it in the frame. Please start at the bottom corner bearing and then snap it into place at the top stay bearing. Check that the locking pin is well secured.
Carefully align the sash with the appropriate adjustment tool to function optimally and not jam. For more information, refer to our adjustment instructions. Finally, attach the water protection caps to the outer frame.